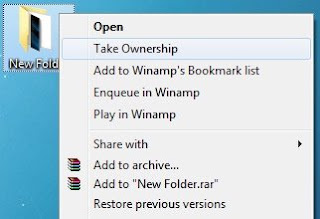
Taking ownership of a file is very essential when you want to replace or edit system folders or files. Though there are many ways to take ownership of files, running a simple registry file is the easiest one.
In this guide I will be focusing on the easiest method using which you can take ownership of files in Windows 7 easily.
In this method, we will merge a registry file with Windows Registry to get an option named “Take Ownership” in the context menu (Right-click menu). This is the simplest and quick method.
1. Download the Ownership.zip file from here.
2. Extract the RAR file to the Desktop or any folder to get
a file named “Ownership.reg”. Note that if you want to see the extension “.reg” you need to enable it in “Folder Options” but it’s not necessary.
3. Right-click on Ownership.reg file and select Merge option.
4. Click “Yes” for the User Account Prompt (UAC) and then again click “Yes” for the Registry Editor pop up and then click “OK” when you get the successful message.
5. Now, you will see a new option named Take Ownership when you right-click on a file or folder.
6. Right-click on folder/file for which you want to take ownership and select Take Ownership option to take ownership of the file or folder.


